
Inside: Find growth mindset inspiration for makers and crafters with a beautiful free printable that can be colored, framed, and hung in your creative space.
Hey, Doodler friend! Thanks for signing up for my newsletter and downloading your copy of the Doodler Mindset printable. I’m so excited and grateful to have you on my list! We’re going to have so much fun doodling together!
Want to know more about the Doodler Mindset? Learn all about it in this post: This Creative Mindset Could Make You a Happy Crafter
You can find the Doodler’s Mindset printable in my resource library. That library is password-protected, and I only give that password to my newsletter subscribers. And as a new subscriber, that password will be delivered to your inbox in a matter of minutes!
While you wait for it to arrive, let’s talk about some ideas for customizing your print to suit your own crafty space.
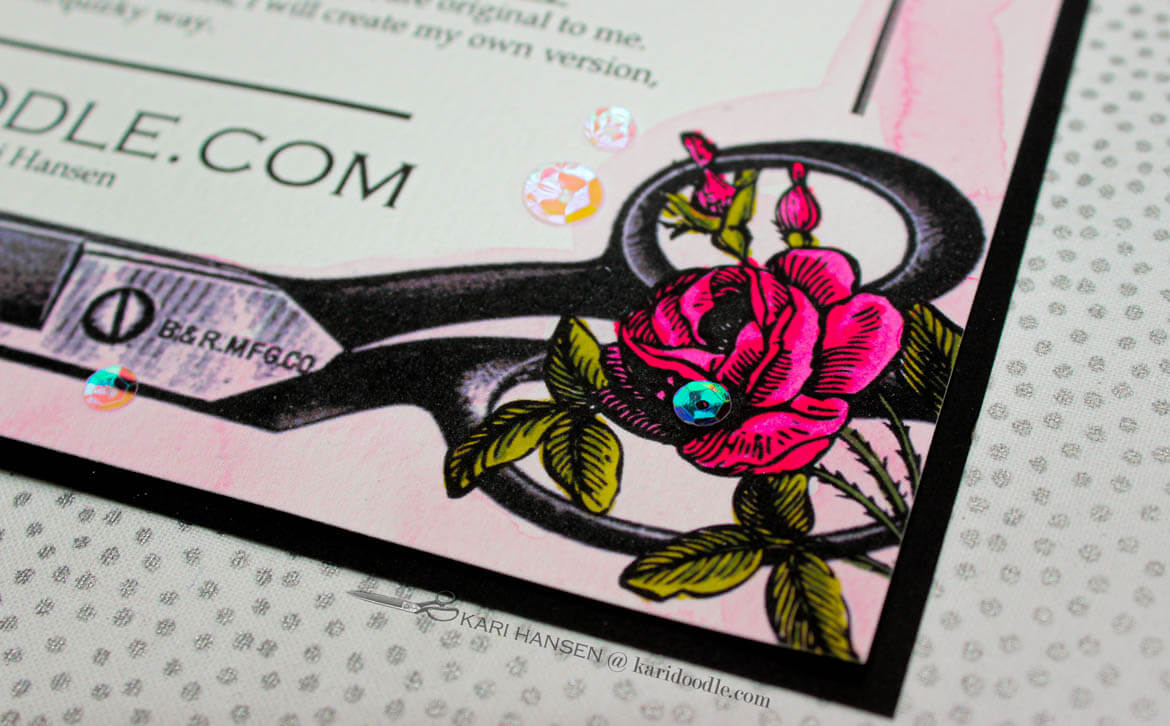
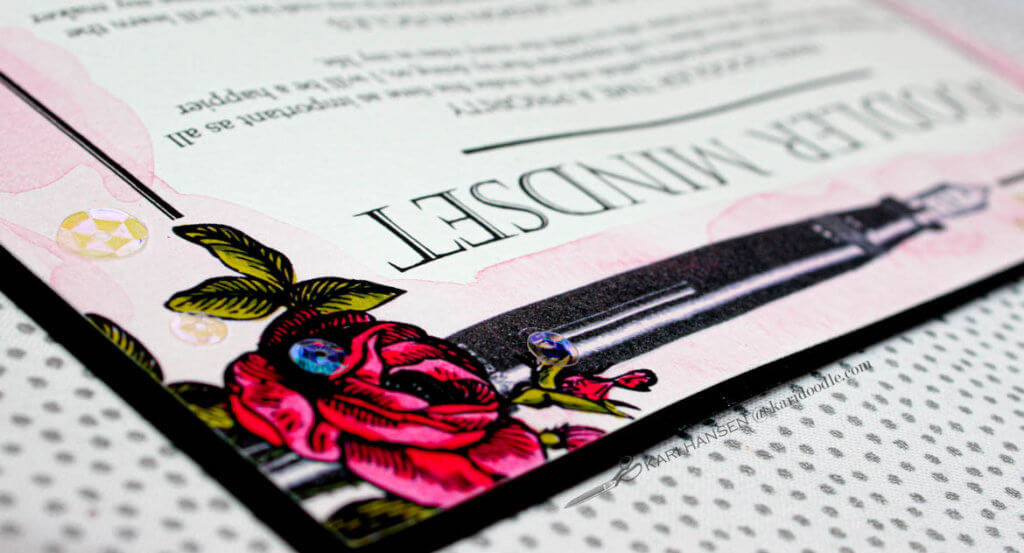
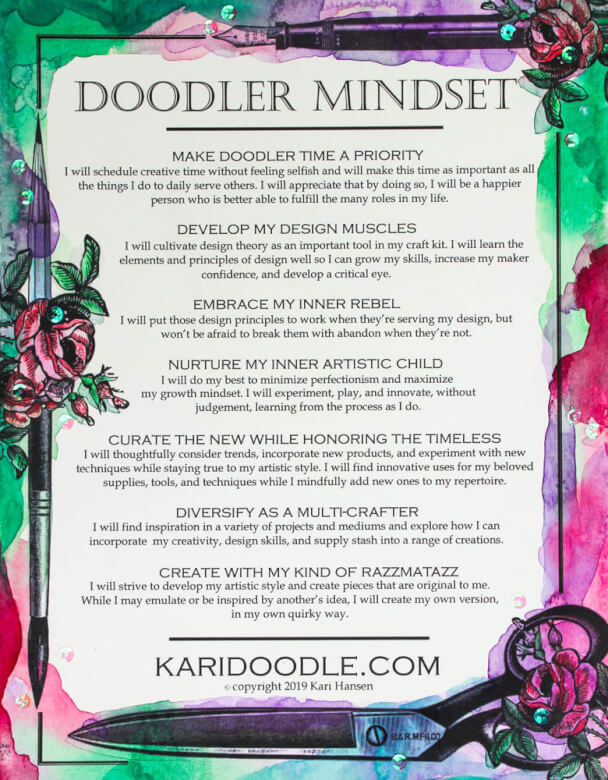
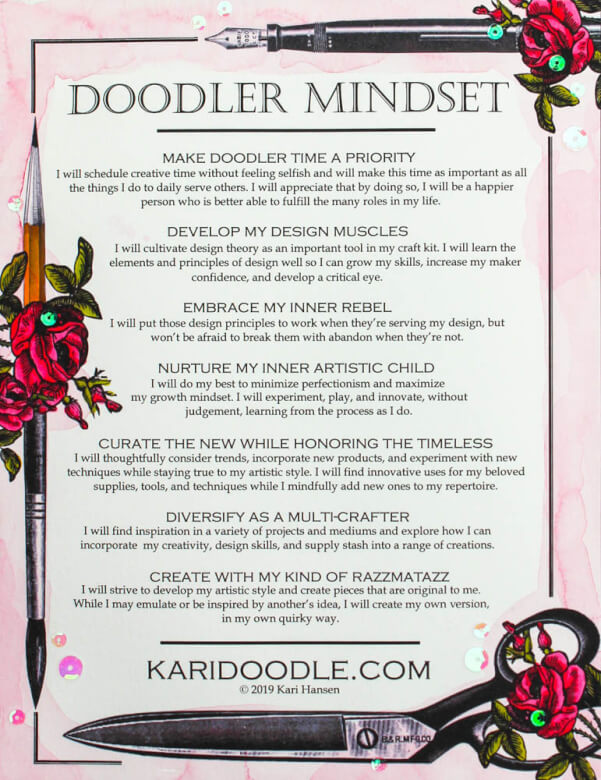
For the Doodler Mindset printable, I’ve designed a retro border to hug the text — full of vintage roses, art implements, and my signature old-school scissors. This design is just begging to be colored! While cool in simple black and white, the print really shines when mindfully colored and embellished by a creative person like you.
Once you get your PDF of the Doodler Mindset printable, feel free to personalize it to suit your style and craft room. I hope you’ll take this design and make it truly your own, customizing it with your favorite colors and media. It’s going to be an awesome collaboration!
If you haven’t already requested your copy, what are you waiting for? When you sign up for my newsletter using the form below, I’ll send you my Doodler Mindset printable right away. And in case you’re wondering what else you get when you subscribe to Doodle News, here’s the scoop:
+ Updates about new projects and craft tutorials on Kari Doodle Studio
+ The password to access all my freebies
+ Early bird dibs on new books, workshops, and classes that I’m working on
+ Plus exclusive goodies and content just for subscribers

In this post:
Pick Your Medium
Make the print your own by coloring the border with your favorite media, whether that’s watercolors, colored pencils, markers, or more!
I made several examples to show you how different media might look. Use these ideas as a springboard to do your own version.
I used an inkjet printer for all my examples, but you can try also try a laser printer or a copier. Test it out to see how the machine’s ink will react with your medium. However, I do suggest that you use a heavy cardstock or watercolor paper that best supports your coloring medium and that will be well suited to framing.
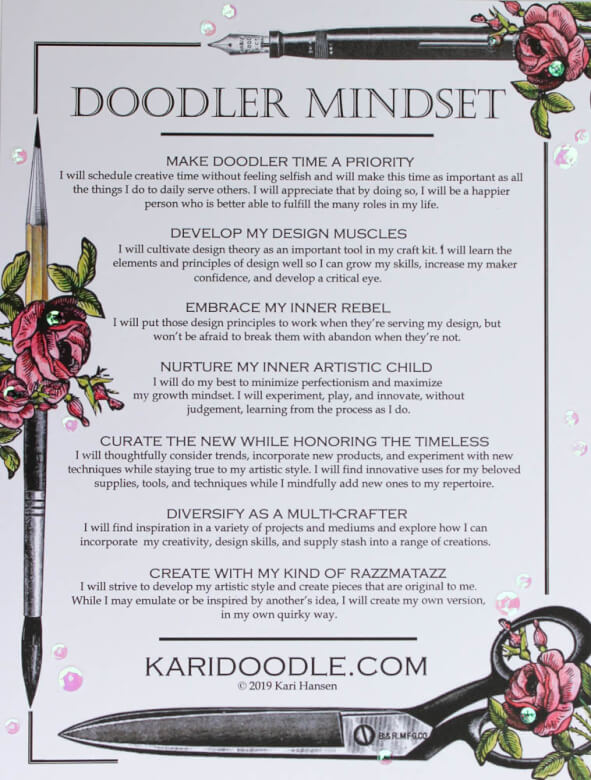
Colored Pencil
For my first and simplest version, I used colored pencils on a plain white background. After printing on #110 white cardstock, I used Prismacolor pencils primarily on the roses and did some simple shading. I like how the colored pencil looks with the vintage clip art, as if it’s a hand-tinted page from an old printing press.
Using colored pencils has the advantage of working well with any kind of printer ink. Regardless of whether you use inkjet, laser, or a copier, you will rarely experience smearing or bleeding of the initial print when you add colored pencil to the image.
Markers
For the second version, I again printed on #110 white cardstock. Next, I used alcohol markers to color the roses and pencil in a similar way as before, with simple shading in vintage hues. The alcohol markers did not smear when used in conjunction with laser or inkjet prints.
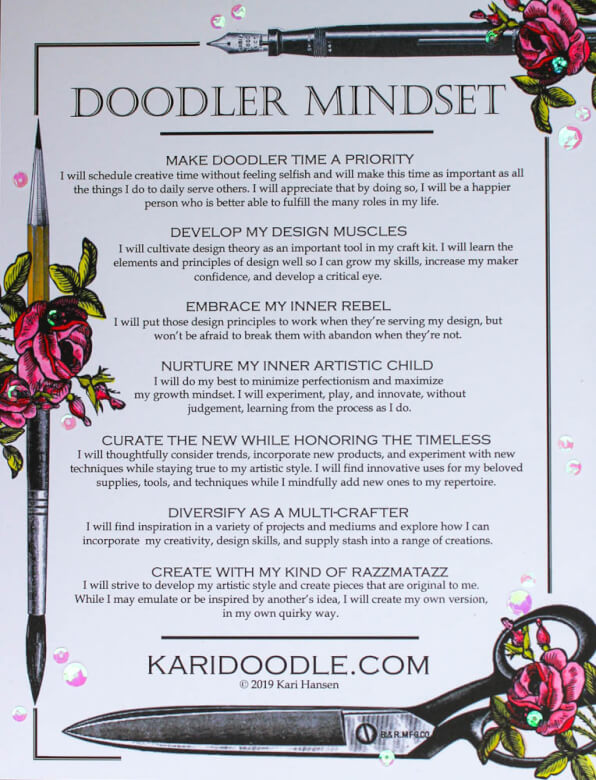
Try other markers you may have on hand, testing how your marker might react with the ink you printed with. Water-based markers like Tombow and Zig will work best with laser-printer ink, as they can cause inkjet prints to smear.
Watercolors
For my last two examples, I wanted to do a watercolor wash behind the printed images. Laser-printer ink will not usually bleed when water-based mediums like watercolor paint are applied to it. If you have a top-loading laser printer, you can simply print directly on watercolor paper and then apply watercolor paint with no smearing issues. Copier toner can also work well in combination with water-based colorants.
However, inkjet printer ink will often bleed when it meets water-based mediums like watercolors and markers. There is waterproof ink available for some inkjet printers, but the regular ink I used did run.
I have both a laser printer and an inkjet printer. However, my laser printer feeds paper through internal rollers rather than being top loading. While it could handle #60 cardstock, it was not happy with #110 cardstock or watercolor paper. When I tried putting those heavier papers in the paper drawer, the machine would not pull the paper through.
Combining Watercolor with an Inkjet Printer
To remedy this situation, I painted first and printed second. I ran the sheet through my inkjet printer once the watercolor paint was completely dry. This turned out to be the best work-around, so if you only have an inkjet printer or your laser printer can’t feed heavy paper, give this method a try. Here’s how I did it:
- Make a test print on copy paper using any kind of printer.
- Tape test print to a light box, then place a piece of watercolor paper on top and tape to keep in place. You can use a well-lit window if you don’t have a light box.
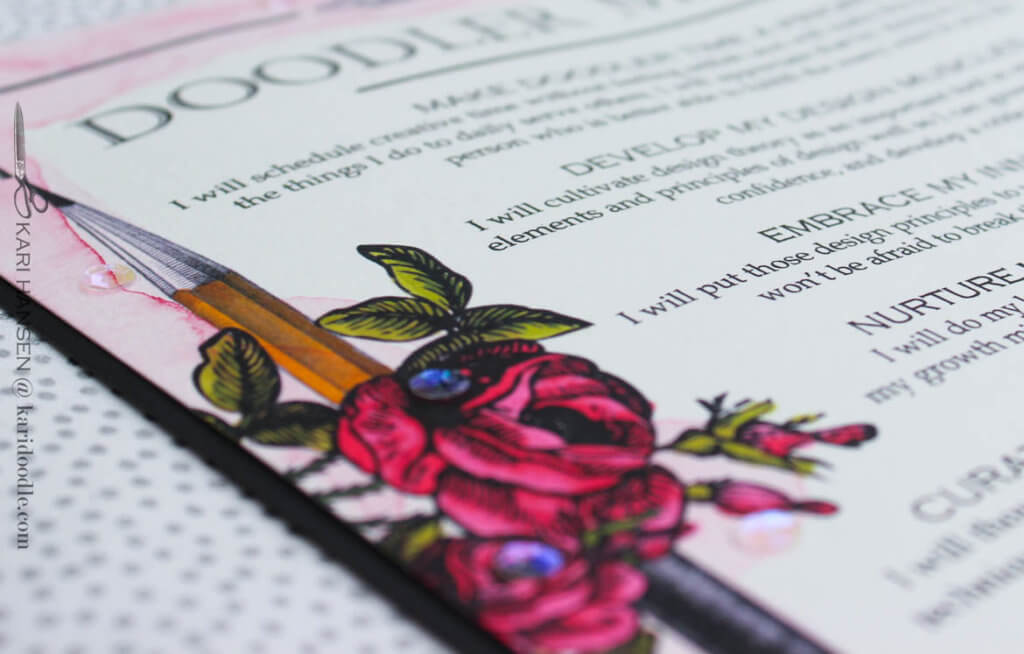
- Using a pencil, make some super light marks on the watercolor paper to act as a guide for applying the watercolors. I wanted to be sure to apply paint behind the scissor handle and all the roses, while avoiding painting behind the actual text.
- Remove the watercolor paper from the lightbox. Apply watercolor washes to watercolor paper and allow to dry. If needed, temporarily place the watercolor paper back over test print on the light box to check for paint placement.
- Check paper orientation of inkjet printer so you know which direction to place the watercolor paper in the top-loader. Should it be top up or top down?
- Run watercolor paper through inkjet printer. Use colorants that are not water-based, such as alcohol markers or colored pencils, to add additional color to roses as desired.
Lighter vs. Darker Watercolor Backgrounds
I used watercolor as a background border on two print examples. For the first example, I used a range of my favorite colors. I layered thin washes of the various colors, allowing each wash to dry before adding more color. As I added the various colors, I let them bloom and merge into each other for a variegated look. After printing on top of the dry paint, I emphasized the roses with colored pencil.
For the second watercolor example, I added layers of wash as before but stuck to a very pale, monochromatic pink color scheme. After printing, I applied stronger color to the roses with alcohol markers.
While I like the more dramatic effect of the first watercolor approach, the darker colors do make the printed images harder to see. The clip art is more distinct against the paler wash of the second version.
Add Finished Touches
After my coloring was finished on each of the four examples, I trimmed the prints down slightly to about 8.5 x 10⁻⁵/8” and matted them with black cardstock. Then I finished all my versions with a smattering of clear iridescent sequins in a variety of sizes. I like how these add a bit of sparkle without detracting from the design.
Which is Your Favorite?
Out of the four versions, which one do you like best? What medium are you going to try on your custom Doodler Mindset print?
No matter what you decide to do, I know it’s going to turn out amazing and reflect your unique style. I can’t wait to see it!
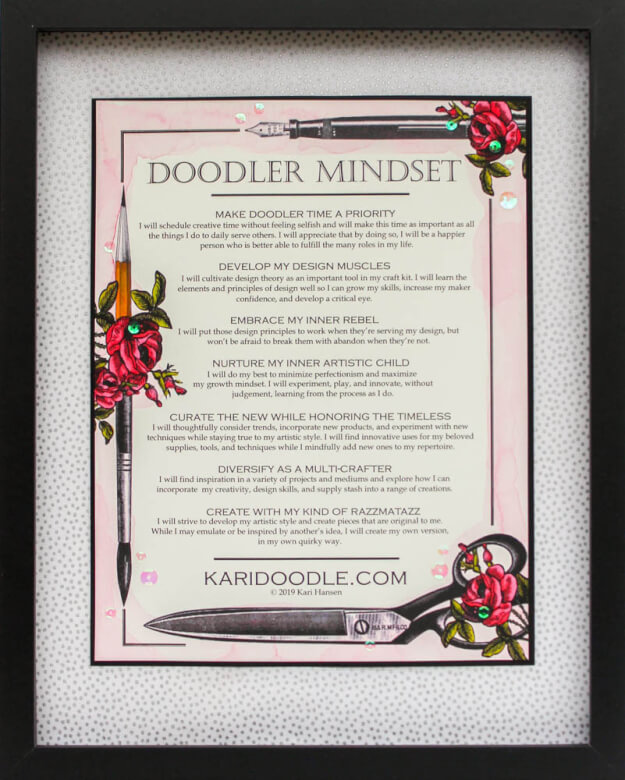
Finish with a Frame
Once you’ve finished making your custom version of the print, get it ready to hang in your craft room or other creative space.
To frame a finished print for my craft room, I purchased a black frame. I chose a shadowbox frame to be sure there was space inside for any dimensional embellishments.
Here’s how to put it together like mine:
- Cut a piece of foam core, chipboard, or mat board to the same size as the frame’s backing board.
- Cover that piece with fabric in a solid color or subtle print, wrapping the fabric around the edges and securing it on the back with straight pins or packing tape. You can also use patterned paper instead of fabric.
- Mount the print onto the fabric-coved backing with foam tape.
- Place into the frame with glass and spacers, then re-assemble the backing board and hanger hardware to finish.
- Hang your custom Doodler Mindset in your creative space and enjoy!
For other solutions to hanging your print without using a traditional frame, here are some ideas to consider:
- An oversized clipboard: Doodlebug 13.5 x 13.5 clipboards in black and white
- Wooden poster hangers: Foundations Décor Magnetic Click Sticks in 3 sizes and 2 colors
- Decorative metal hanger with clips: Tim Holtz Display Hangers
Supplies
- Black shadowbox frame
- Epson Artisan 1430 inkjet printer
- Brother laser printer
- White #110 cardstock
- Black cardstock
- Canson XL watercolor paper
- Watercolor paints
- Watercolor brushes
- Colored pencils
- Alcohol markers
- Iridescent sequins
- White and silver dot fabric
- Similar fabric: Timeless Treasures Polka Dot Silver fabric
- Foam tape
- Liquid adhesive