Inside: Step-by-step instructions to create artsy handmade “Thanks a Latte” cards using Finetec rose-gold metallic watercolors and coffee-cup die cuts by Honey Bee Stamps.

To quote Ringo Starr’s best-loved tune, there are times when we need a little help from our friends. I needed to lean on friends recently when I took on a big project: to create a pop-up craft store to sell the mammoth pile of craft supplies I had decluttered from my studio. I’d done a Konmari on 18 years’ worth of stuff and wanted to now sell it at a local papercrafting show.
For weeks, I worked on hauling, sorting, bagging and tagging boxes of new and gently-used supplies. I grouped scrapbook collections together, made grab bags of stickers and rub-ons, and priced a ton (literally) of wood-mounted rubber stamps.
While this was loads of work, it was easy compared to how many favors I had to ask of friends to make the booth happen. I’m much more comfortable helping others than I am asking for help for myself!
I asked one friend if she could bring her pickup truck and help me load-in at the show. Another friend to help me run the booth on Friday morning (the most crazy-busy time of the whole show). And yet another friend to pick-up and keep my kids after school on Friday. Asking for help was hard, but those lovely people were happy to lend a hand. I am truly blessed to have such friends!
To show them my appreciation, I made a batch of thank-you cards. A “thanks a latte” theme seemed perfect, as there were many jokes between us about the booth project being fueled by copious amounts of coffee.
In this post:
How to Make Rose Gold Coffee Cards
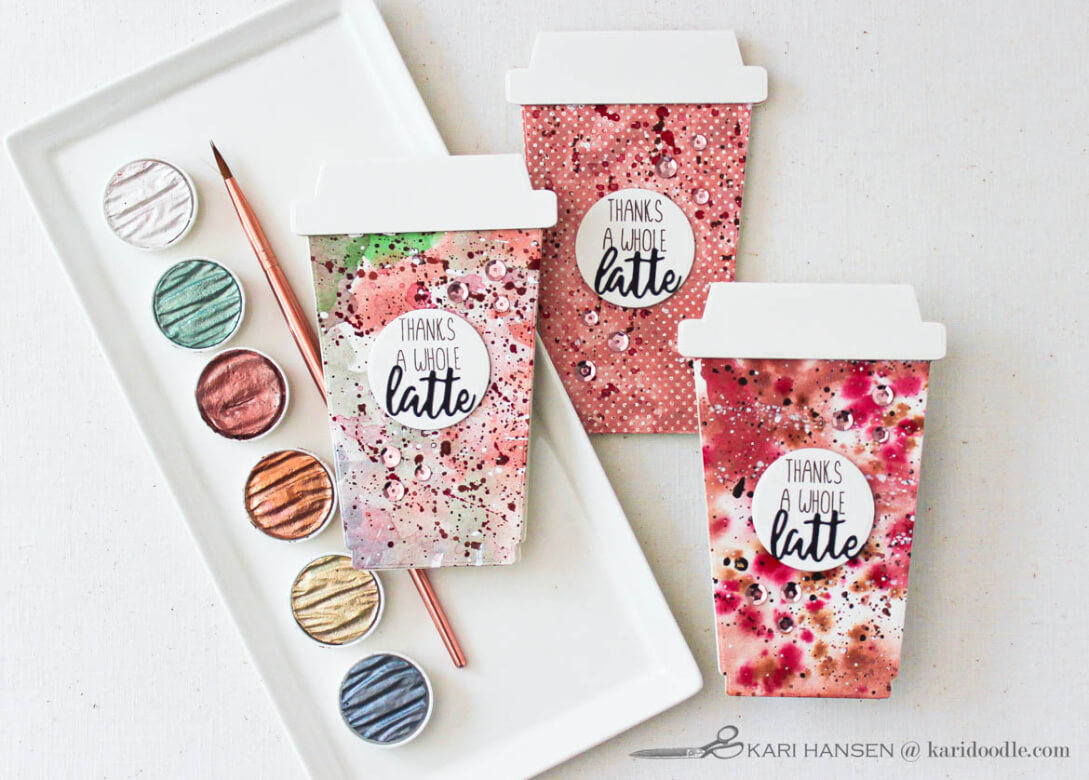
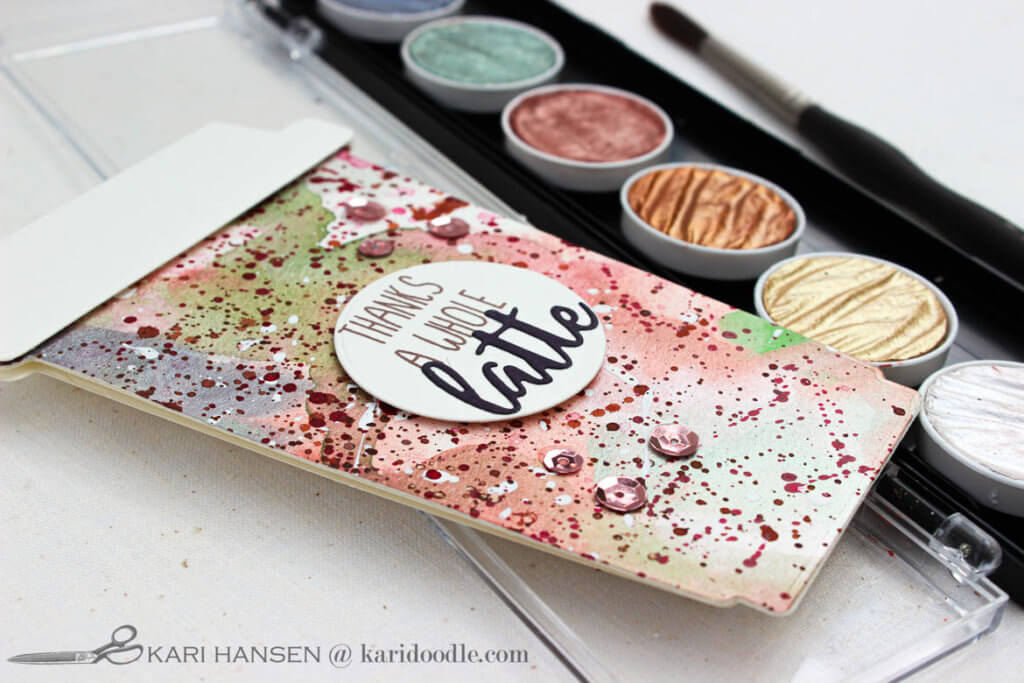
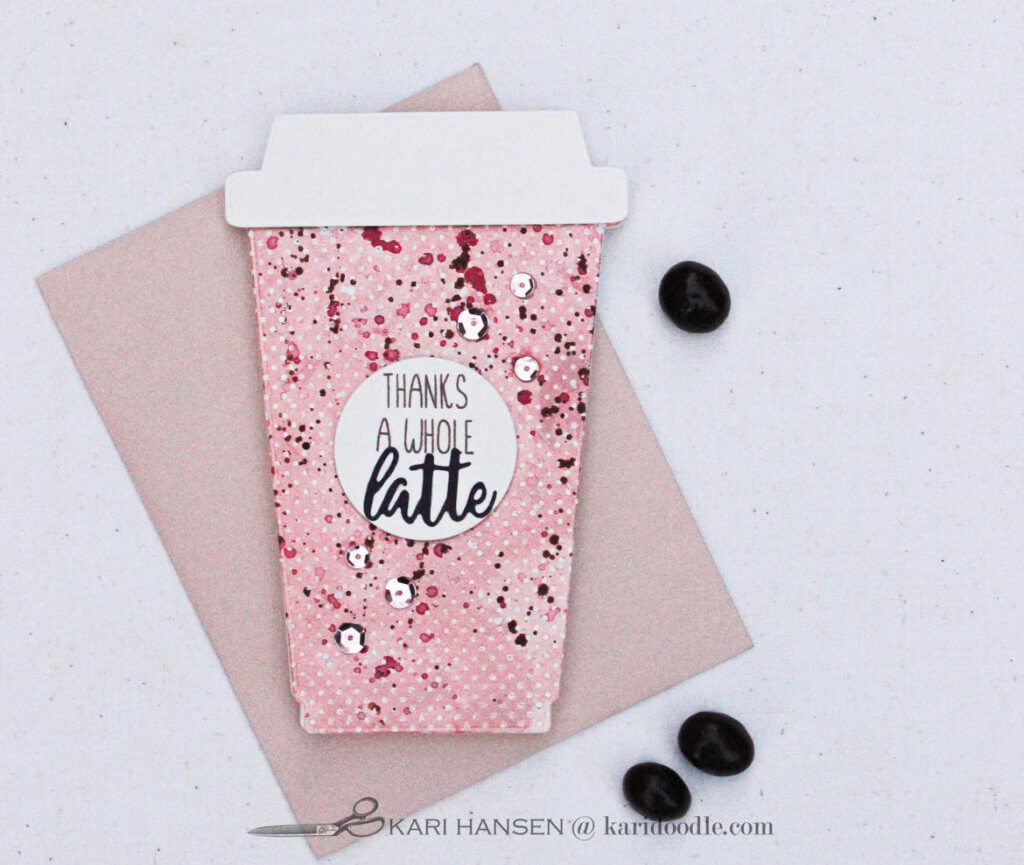
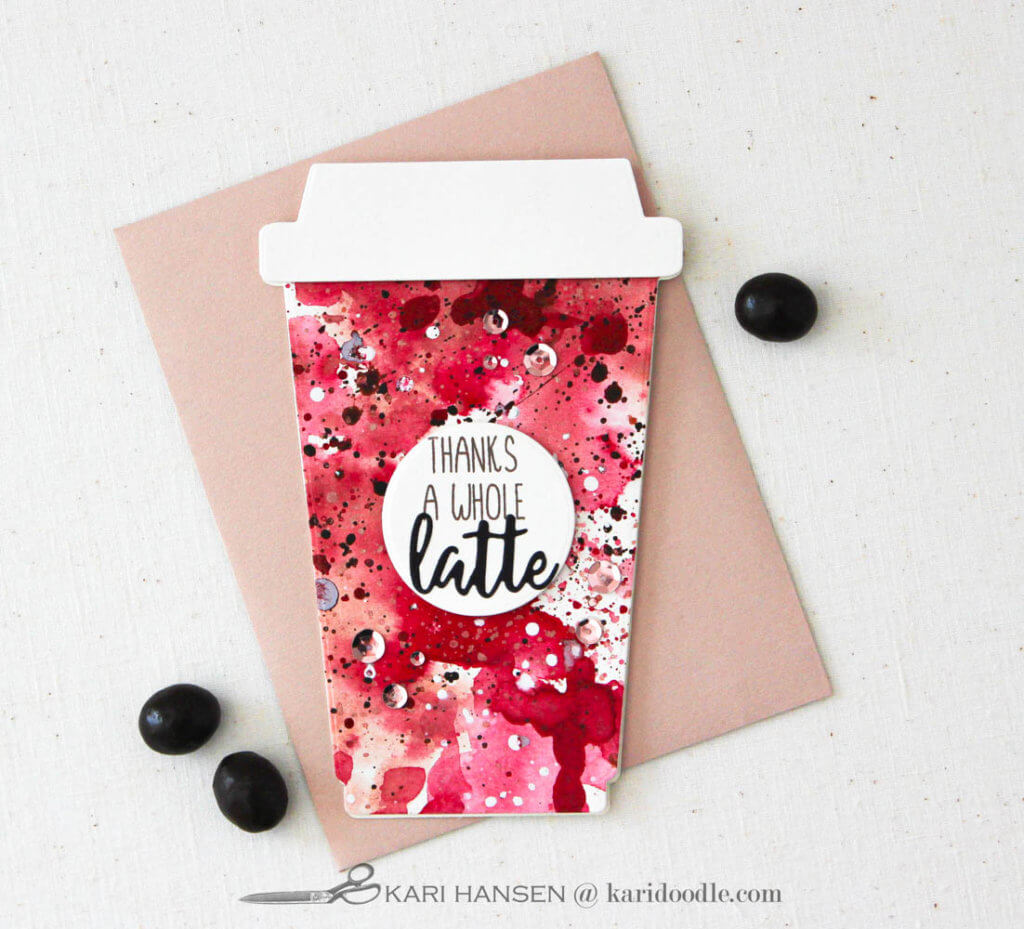
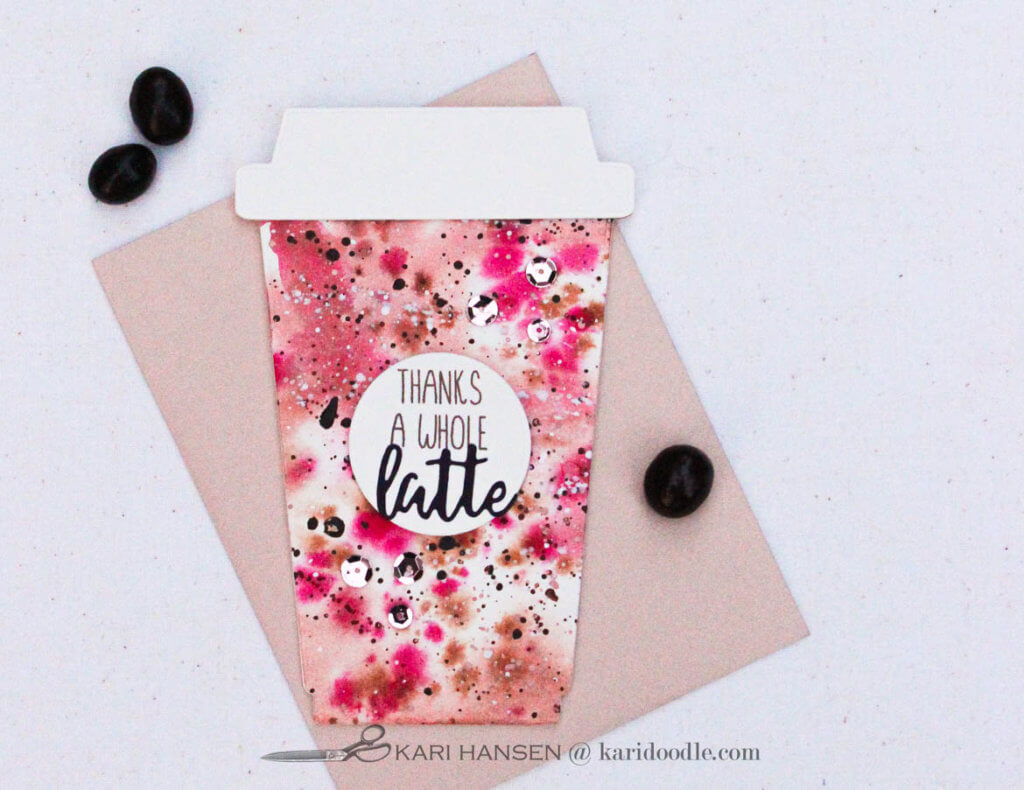
I made the cards using the Coffee Cup Card die set from Honey Bee Stamps. This die set creates a coffee-cup shaped folding card with a finished size of about 3.5 x 5.5”. It also includes dies for a cup sleeve, lid, circular label, and a coordinating shaker frame.
I used Honey Bee’s Perfect Blend stamp set and dies for the sentiment. I stamped part of the sentiment directly on the circular label and then finished it by die-cutting “latte” out of java-toned cardstock.
Find more metallic watercolor cards: How to Make Shimmery Die Cuts for Stunning Fall Cards
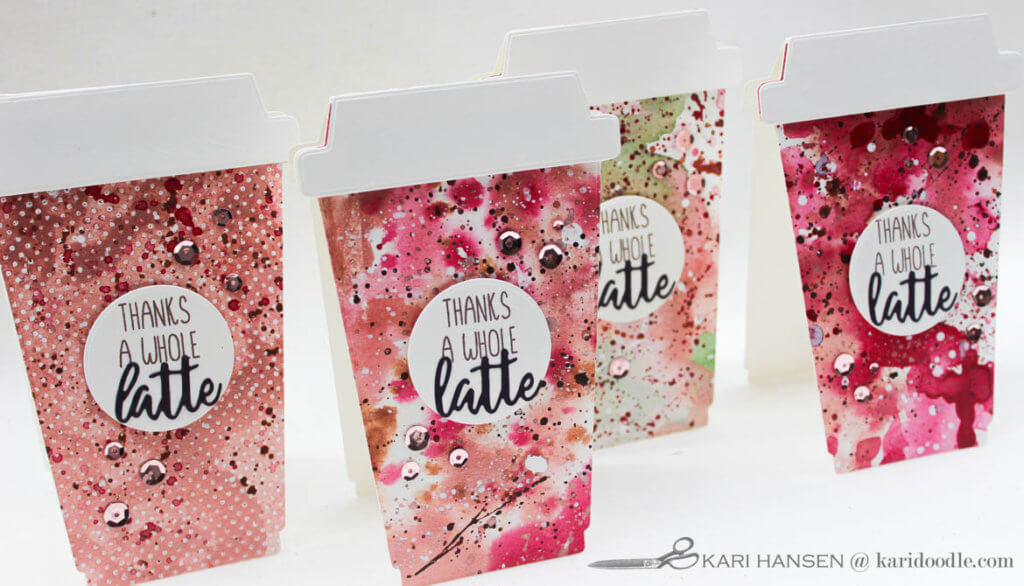
I used two kinds of watercolors to create the backgrounds. For the main color, I used the rose-gold pan from the Pearlcolors watercolor set in Silk by Coliro/Finetec. The Silk set contains six metallic pearlescent colors in pale silver, gold, bronze, rose gold, mint and gunmetal. I also used raspberry-red and coffee-brown pans from the Kuretake Gansai Tambi watercolor set.
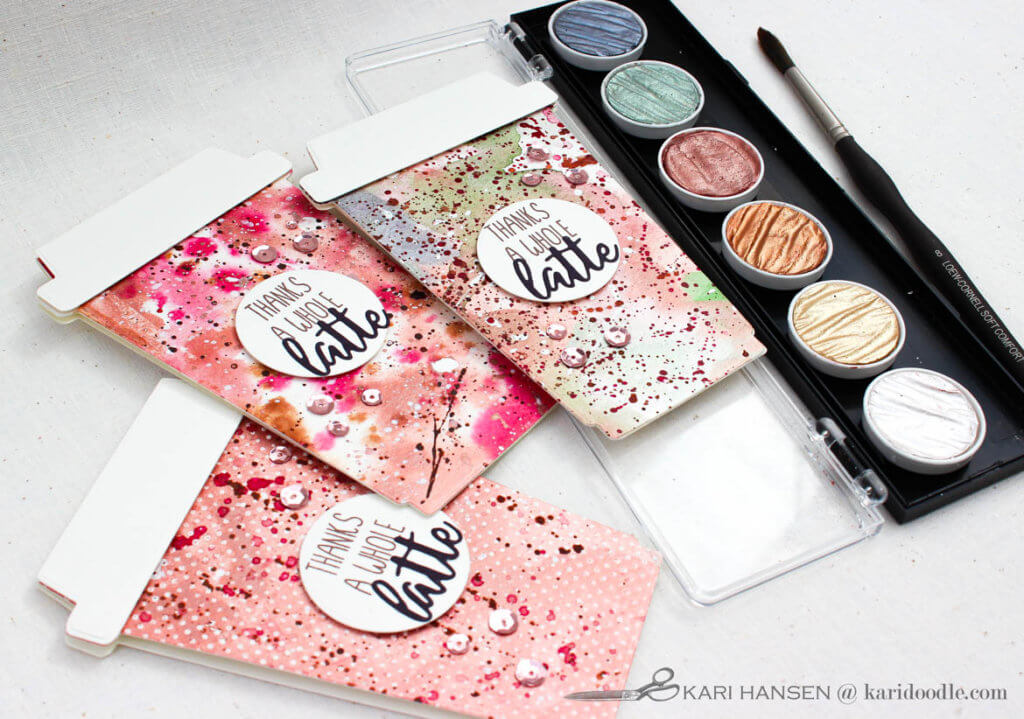
For the backgrounds, I layered loose strokes of paint onto wet watercolor paper. When dry, I finished the look with paint splatters. For one of the backgrounds, I stamped and heat-embossed a white dot pattern onto watercolor paper before I began painting.
The photos don’t do justice to the shimmer of the rose gold watercolor paint. Its subtle sparkle is gorgeous in person.
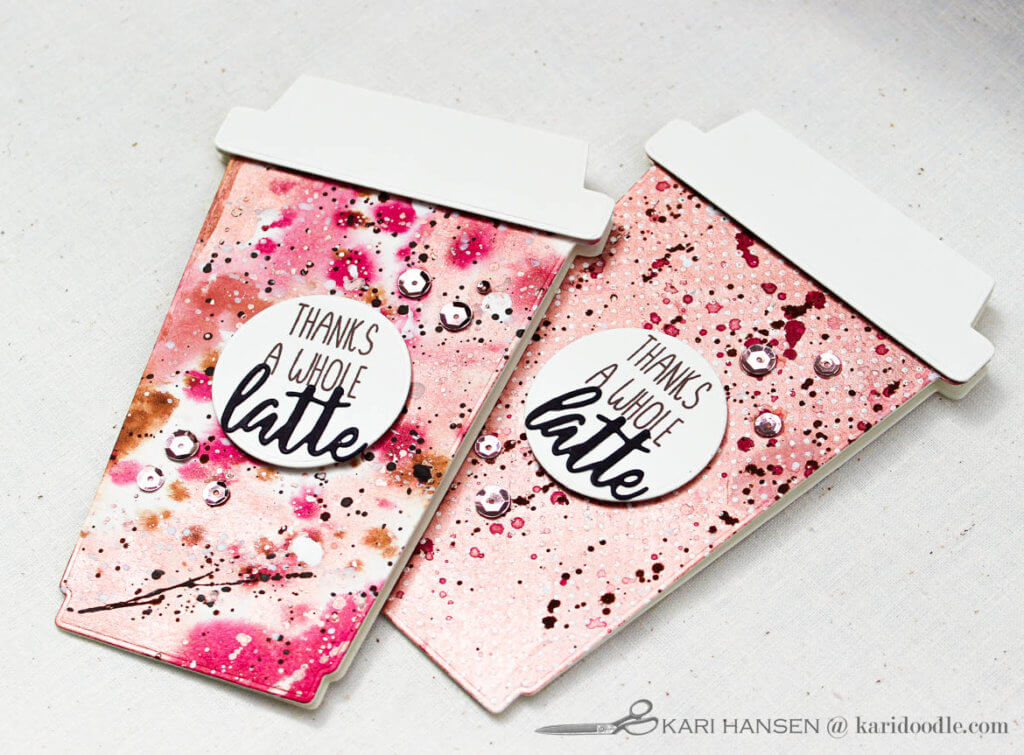
After assembling the cards, I finished each with rose-gold sequins from Studio Katia and paired them with rose-gold pearlized envelopes from Paper Accents.
I’ll tuck a Starbucks gift card inside each card before sending them off to my awesome friends. A bit of coffee and handmade love is the least I can do to express that I’m thankful a whole latte for their friendship!

Step-by-Step: Thanks a Latte Coffee Cards
Polka-dot card background:
- Apply anti-static powder to 4.5 x 6” piece of hot press watercolor paper (Canson XL). Stamp Itsy Bitsy Polka Dot background stamp (My Favorite Things) onto paper using Versamark clear ink.
- Add white embossing powder (Alabaster by Brutus Monroe). Tap off excess powder. Heat set until melted and solid.
- Tape watercolor paper to hardboard. Use wide, flat brush to wet paper with clear water. Paint on loose strokes of rose gold watercolor, allow to dry.
- Add additional areas of rose gold and allow to dry. Add paint splatters in raspberry red (no. 36) and coffee brown (no. 47) from the Kuretake Gansai Tambi set. Finish with a few splatters of watered-down white acrylic paint, allow to dry.
Other watercolor backgrounds:
- Tape watercolor paper to hardboard. Use wide, flat brush to wet paper with clear water. Paint on loose strokes of raspberry red, coffee brown, rose gold and other colors as desired. Allow to dry.
- Add additional layers of color and allow to dry.
- Add paint splatters in raspberry red and coffee brown. Finish with a few splatters of watered-down white acrylic paint.
Sentiment:
- Die-cut circular tag from Coffee Cup Card die set (Honey Bee) out of same watercolor paper.
- Stamp “Thanks a Whole Latte” from Perfect Blend (Honey Bee) stamp set in Memento Rich Cocoa ink on top portion of circular label.
- Die-cut “latte” from Perfect Blend die set (Honey Bee) in dark brown cardstock. Adhere to bottom area of circular label.
Card assembly:
- Die-cut cup lid from same watercolor paper.
- Make card base: die-cut folding card from ivory cardstock. Fold at score line using bone folder.
- Make card front: place one side of cup die over watercolored background. Tape in place with low-tack tape, then run through die-cut machine.
- Adhere card front to folded card base. Using foam tape, adhere cup lid and circular label to card.
- Use liquid glue to adhere a scatter of rose gold sequins (Studio Katia) around circular label.
See more ideas for uniquely shaped cards: How to Make Terrarium Cards with Geometric Dies
Supplies
- Coffee Cup Card die set (Honey Bee)
- Perfect Blend stamp set (Honey Bee)
- Perfect Blend die set (Honey Bee)
- Itsy Bitsy Polka Dot background stamp (My Favorite Things)
- Rose gold pearlescent watercolor (Coliro/Finetec set in Silk)
- Watercolor set (Kuretake Gansai Tambi)
- Watercolor paper, hot press (Canson XL 9 x 12” pad)
- Rose Gold Fusion sequins (Studio Katia)
- Versamark clear embossing ink (Tsukineko)
- Memento Rich Cocoa dye ink (Tsukineko)
- White embossing powder (Brutus Monroe in Alabaster)
- White acrylic craft paint
- Dark brown cardstock
- Ivory cardstock 110#

Tools
- Stamping platform (Misti)
- Heat tool (Wagner)
- Die-cut machine (Spellbinders Platinum 6)
- Paper trimmer (Tonic)
- Jewel picker (Marvy)
- Adhesive runner (Kokuyo Dotliner Long)
- Multi Medium matte liquid glue (Ranger)
- Hardboard
- Watercolor brushes
- Painters Tape
- Foam tape (3M)
- Anti-static powder tool
- Teflon bone folder